7 Pro Tips to Get Smokey Eye Like a Makeup Artist
 0.4 gm
Bold 4 4-IN-1 Kajal
That perfect smokey eye look you see on red carpets and Instagram feeds? It's not as impossible as it seems. Real talk—the difference between a muddy mess and that sultry, professional finish comes down to knowing the right techniques. Whether you're after a subtle brown smokey eye for daytime or a dramatic black smokey eye for evening, these seven pro tips will help you get smokey eye results that actually look intentional. No more guessing games or YouTube rabbit holes—just straightforward advice that works for beginners and makeup enthusiasts alike.
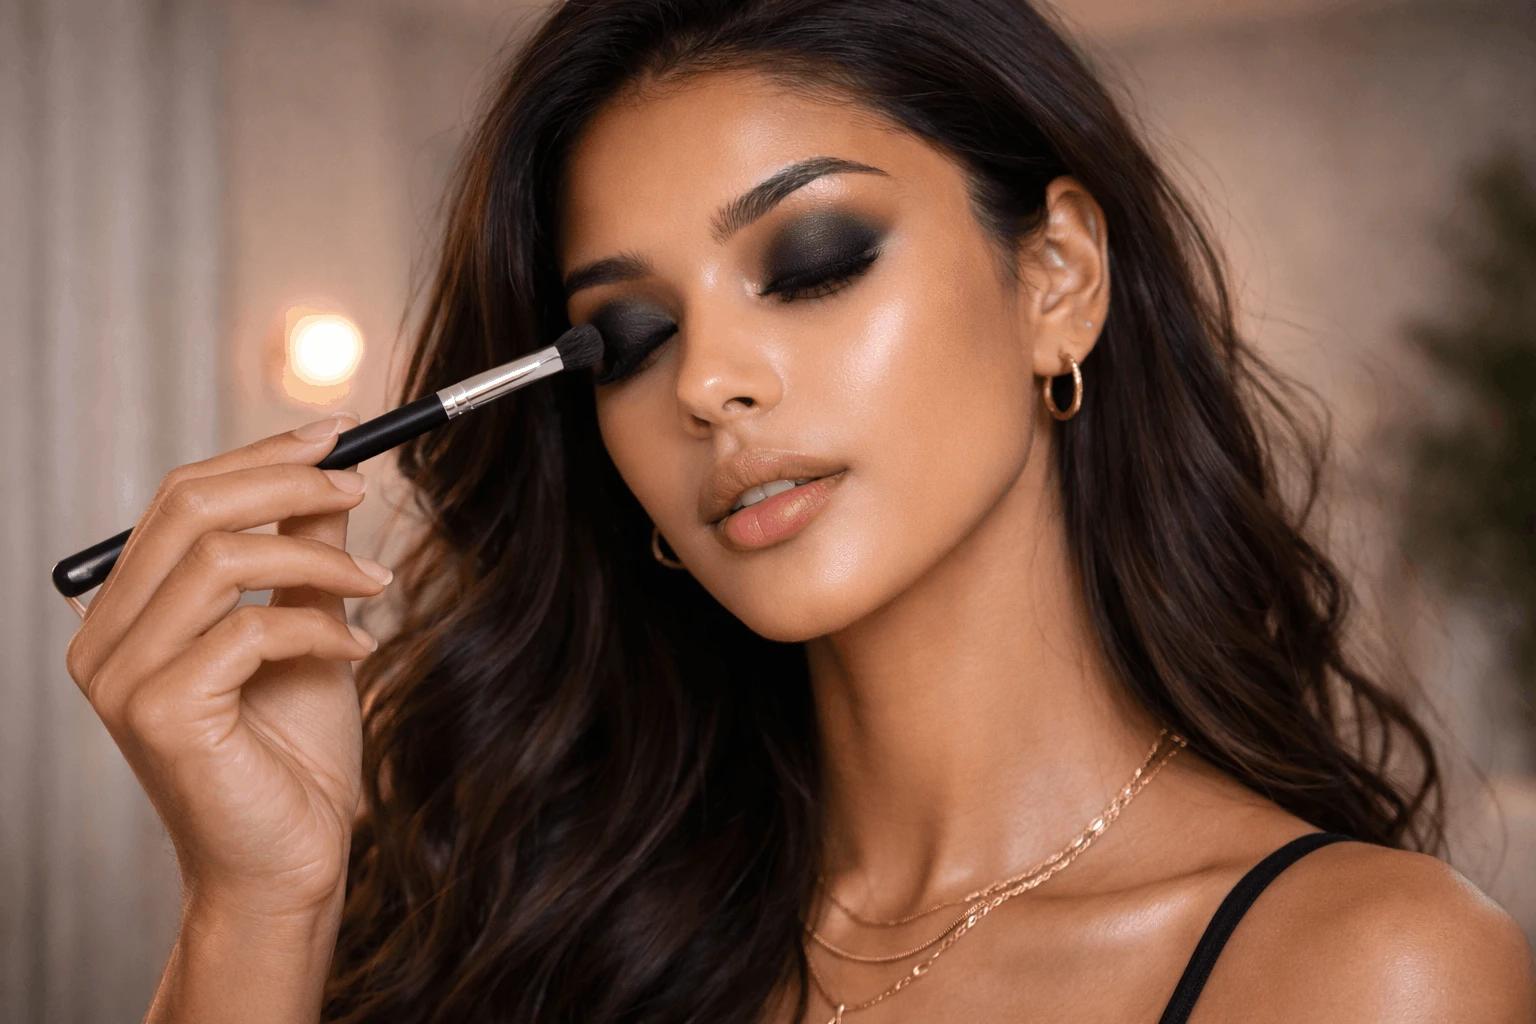
A proper smokey eye look isn't just about slapping on dark eyeshadow and hoping for the best. It's all about creating depth, dimension, and that seamless gradient that makes eyes look bigger and more defined. The magic happens in the blending—those smooth transitions between light and dark shades that create the signature smokey effect. Most beginners make the mistake of going too dark too quickly or skipping the blending altogether. Professional makeup artists know that a great smokey eye makeup starts with the right base and builds up gradually. The key is creating contrast without harsh lines, using strategic colour placement to enhance your natural eye shape. What makes this look so timeless is its versatility. Whether you've got hooded eyes, round eyes, or anything in between, the smokey eye technique can be adapted to flatter your unique features. It's not about following one rigid formula—it's about understanding the principles and tweaking them to work for you.
Before diving into techniques, let's sort out your toolkit. Having the right brushes and products makes the difference between struggling for an hour and nailing your smokey eyeshadow in minutes.
Your brush collection doesn't need to be massive, but these four are non-negotiable. A flat shader brush packs colour onto the lid efficiently, whilst a fluffy blending brush creates those seamless transitions that scream professional. You'll also want a small detail brush for precise work around the inner corners and lower lash line, plus a smudge brush for blending eyeliner into that perfect smokey finish.
A good smokey eye palette should have at least three shades that work together—a light highlight, a medium transition shade, and a deep colour for drama. Matte finishes are your best friend for blending, though a touch of shimmer on the lid can add that extra pop. Don't feel pressured to splurge on expensive palettes when starting out—there are brilliant budget options that perform just as well.
Eyeshadow primer isn't optional—it's the foundation that makes everything else work. Without it, your carefully blended smokey eye tutorial efforts will crease and fade within hours. A good eyeliner (pencil for beginners, gel for pros) and volumising mascara complete the essential lineup.
This might seem basic, but primer application can make or break your smokey eye for beginners journey. Think of primer as the double-sided tape that keeps everything in place whilst making colours pop. Apply primer from the lash line to the brow bone, blending it out evenly with your finger or a flat brush. Don't forget the lower lash line if you're planning to add colour there too. Let it set for about 30 seconds before moving on—this brief wait prevents your first eyeshadow shade from turning patchy. The right primer also prevents fallout, which is especially important when working with darker shades. Nothing ruins a good base like black eyeshadow specks all over your foundation. Set your primer with a light dusting of translucent powder or a skin-tone eyeshadow for extra staying power.
 4.5 gm
Dual Passport Eyeshadow Palette
This is where the magic happens. Understanding where to place each shade transforms a basic eyeshadow application into a professional smokey eye look.
Think of your eye area in three zones: the lid (from lash line to crease), the crease (that natural fold), and the highlight area (under the brow bone and inner corner). Your darkest shade goes on the outer two-thirds of the lid and outer crease, medium shade blends through the crease, and lightest shade highlights strategic points.
A brown smokey eye works brilliantly for daytime or when you want something sultry but not too intense. Browns are forgiving and blend easily, making them perfect for beginners. Start with warm chocolate or espresso shades, building up to deeper browns in the outer corner. For evening drama, a black smokey eye brings the intensity. But here's the thing—pure black can look harsh on its own. Mix in some deep greys or charcoals for a softer, more blendable finish. The key is building up gradually rather than going full-on dramatic from the start.
Blending separates amateur attempts from professional results. This is what makes an easy smokey eye actually look easy, even though it takes practice to master. The windshield wiper motion is your best friend here. Use a clean, fluffy brush and move it back and forth across the crease area where colours meet. Keep the motion light and build up gradually—heavy-handed blending just pushes colour around without actually blending it. Start with less product than you think you need. It's much easier to add more colour than to remove excess. If you've gone too dark, don't panic—use a clean brush with a lighter shade to soften and blend out the harsh edges. The secret to seamless transitions is using multiple brushes. Don't try to blend everything with one brush, or you'll just end up moving muddy colour around. Clean brushes between shades, or have several on hand for different steps.
Eyeliner in a smokey eye isn't about crisp, perfect lines—it's about creating soft definition that enhances the overall smokey eyeshadow effect. Tight-lining (applying liner between the lashes) makes your lash line look fuller without obvious liner. This technique works especially well for subtle smokey looks where you want definition without harsh lines. Use a pencil liner for this—gel can be too intense, and liquid is nearly impossible to control in tight spaces. For the smokey effect, apply your liner normally, then immediately smudge it with a small brush or cotton bud whilst it's still soft. This creates that perfectly imperfect, lived-in look that defines smokey eyes. Don't forget the lower lash line—a thin line of smudged liner here ties the whole look together.
One size doesn't fit all when it comes to how to smokey eye application. Your eye shape determines where to place the darkest colours and how high to blend.
 Combo
ComboBold & Waterproof Eye Combo
With hooded eyes, traditional crease placement disappears when your eyes are open. Instead, place your transition shade slightly above where your natural crease sits, and keep the darkest colours closer to the lash line. This ensures your hard work stays visible when your eyes are open.
Round eyes benefit from extending the smokey effect outward and upward, creating a more almond-like shape. Focus the darkest colours on the outer corner and blend upward toward the tail of your brow. This elongates the eye shape beautifully.
Almond eyes can handle most smokey eye techniques beautifully—you've won the genetic lottery here. For monolid eyes, focus on creating depth with strategic highlighting rather than relying solely on dark colours. A touch of shimmer on the centre of the lid can create the illusion of dimension.
This is where patience pays off in your smokey eye tutorial journey. Professional makeup artists never go from zero to full drama in one step—they build up colour gradually for better control and more natural-looking results. Start with the lightest version of your desired look, then add depth layer by layer. This approach lets you stop at any point if you're happy with the intensity, or keep building for more drama. It also prevents the muddy, over-blended look that happens when you try to fix mistakes with more product. If you do go too dark, don't try to remove product—instead, blend a lighter shade over the top to soften the intensity. This maintains the smooth gradient whilst toning down the drama. When exploring new techniques or products, platforms like Smytten make it easier to experiment without commitment. With curated trial packs from trusted makeup brands, you can test different eyeshadow formulas and find what works best for your smokey eye makeup routine before investing in full-size products.
The details make all the difference in professional smokey eye makeup. These final steps transform a good smokey eye into a stunning one. Highlight the inner corners with a light, shimmery shade—this opens up your eyes and adds a touch of glamour. A subtle highlight under the brow bone also helps define the eye area and makes your brows look more lifted. Mascara application deserves special attention with smokey eyes. Focus on separating and lengthening rather than just adding volume. Clumpy lashes can overwhelm the carefully crafted eyeshadow work. Consider individual false lashes on the outer corners for extra drama without the commitment of a full strip. Don't forget the lower lash line—a thin line of the same dark shade used on your lid, smudged softly, ties the whole look together. Keep it subtle though; the upper lid should remain the star of the show.
Ready to put it all together? This smokey eye tutorial breaks down the process into manageable steps that work whether you've got five minutes or fifteen.
When time's tight, focus on the essentials. Prime your lids, apply a medium-toned shade across the entire lid, then use a darker shade just on the outer third and lower lash line. Blend quickly with a fluffy brush, add mascara, and you're done. This simplified approach still gives you that sultry effect without the time commitment.
 25 gm
25 gmPower Stage Eyeshadow Palette
For the full experience, start with primer and let it set. Apply your lightest shade as a base, then work your medium shade into the crease using windshield wiper motions. Add your darkest shade to the outer corner and blend inward, building up intensity gradually. Line and smudge your eyes, highlight strategic points, and finish with mascara. Take your time with each step—rushing leads to muddy results.
For a natural smokey eye, stick to brown and taupe shades that are only one or two shades darker than your skin tone. Focus on subtle blending and skip the dramatic liner. The goal is enhanced definition rather than obvious makeup.
You'll need eyeshadow primer, at least three coordinating eyeshadow shades, blending brushes, eyeliner, and mascara. A good palette with matte and shimmer options covers most bases. Quality brushes matter more than expensive eyeshadows.
Start with primer, apply a base shade across the lid, work a darker shade into the crease, blend thoroughly, add your darkest shade to the outer corner, line and smudge the eyes, then finish with mascara. Practice the blending motion before adding product.
Brown eyes look stunning with purple, bronze, and gold smokey eyes. These colours make brown eyes pop more than traditional black or grey. Navy blue also creates beautiful contrast with brown eyes.
With proper primer and setting techniques, a smokey eye should last 8-12 hours without significant fading. Touch up with a bit of the darkest shade if needed, but good preparation usually prevents major touch-ups.
Mastering the perfect smokey eye takes practice, but these seven pro tips give you the foundation to create stunning results from day one. Remember, the best smokey eye look is one that makes you feel confident and suits your personal style. The beauty of smokey eyes lies in their versatility—from subtle brown smokey eye looks perfect for the office to dramatic black smokey eye styles for special occasions. With the right techniques and a bit of practice, you'll be creating easy smokey eye looks that rival any professional makeup artist. Experimenting with different products and techniques becomes much more accessible when you can try before you buy. Smytten's curated trial packs from trusted makeup brands let you explore various eyeshadow formulas, primers, and tools without the commitment of full-size purchases. With over 1,500 brands available and the convenience of trying up to 8 minis for just ₹249, discovering your perfect smokey eye products has never been easier. After all, why settle for 'maybe' when you can try it all and find exactly what works for your unique style?
