7 Pro Tips for the Best Smokey Eye Look
 12 gm
12 gmFearless Eyeshadow Palette Smokey
Let's be real—the best smokey eye can feel like this mythical makeup look that only professionals can nail. You've probably watched countless tutorials, bought multiple palettes, and still ended up looking like you got into a fight with your eyeshadow. But here's the thing: creating that perfect smokey eye look isn't about having expensive products or years of experience. It's about knowing the right techniques and having a game plan. Whether you're after a classic black smokey eye for a night out or a softer brown smokey eye for everyday glam, these seven pro tips will transform your makeup game. Ready to finally master that smokey eye makeup you've been dreaming about?
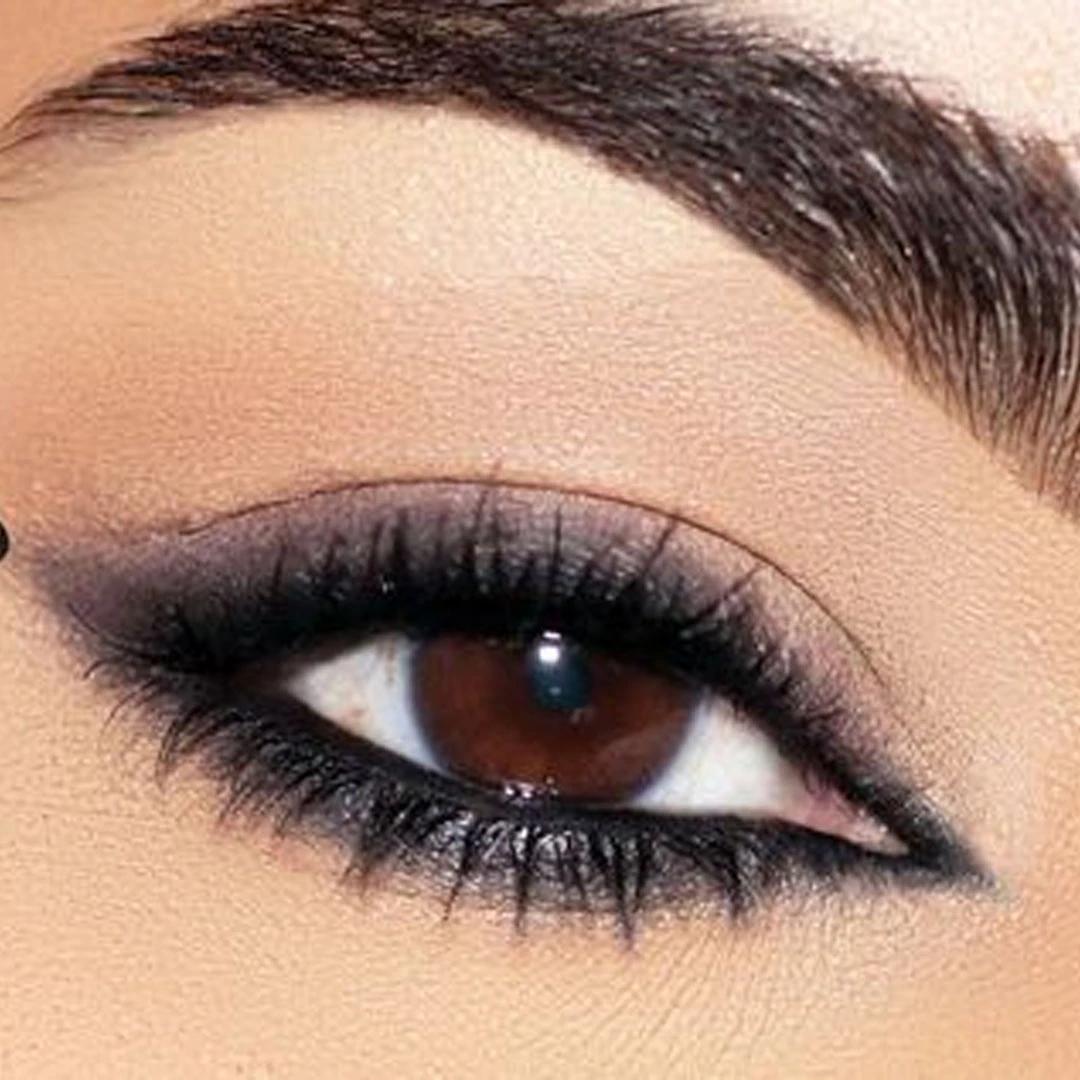
The best smokey eye isn't just about slapping on dark eyeshadow and hoping for the best. It's all about creating that perfect gradient—you know, where colours seamlessly blend from light to dark without any harsh lines or patchy spots. Think of it like a sunset, where each shade melts into the next. A proper smokey eye look has three key elements: depth, dimension, and that sultry, smouldered effect. The magic happens when you build intensity gradually, creating shadows that make your eyes look bigger and more defined. And contrary to what you might think, smokey eyes aren't just for special occasions or dramatic evening looks.
Here's something worth knowing—smokey eyes are actually universally flattering. Whether you've got hooded eyes, deep-set eyes, or any other eye shape, the right smokey eyeshadow technique can enhance what you've got. The key is adapting the placement and intensity to suit your features.
Let's bust some myths right now. First, smokey eyes don't have to be black or super dark. A brown smokey eye can be just as stunning and way more wearable for daytime. Second, you don't need a million brushes or professional-level skills. With the right approach, even beginners can nail this look.
Real talk—if you're skipping eyeshadow primer, you're basically setting yourself up for disappointment. This step is absolutely non-negotiable for smokey eye makeup that actually lasts and looks professional. Eyeshadow primer creates a smooth, grippy base that helps your colours stay put and appear more vibrant. Without it, your carefully blended smokey eyeshadow will probably crease, fade, or turn muddy within a few hours. Not exactly the vibe you're going for.
For oily lids, go for a mattifying primer that controls shine. If you've got dry skin, look for something more hydrating. The goal is to create the perfect canvas for your how to smokey eye masterpiece.
Apply primer from your lash line to just above your brow bone, then gently pat it in with your finger. Let it set for about 30 seconds before you start with your eyeshadow. This simple step will make your colours pop and your blending so much easier.
Picking the right smokey eye palette can make or break your look. While a classic black smokey eye is timeless and dramatic, don't sleep on other options that might actually be more flattering for your colouring. A brown smokey eye is incredibly versatile and works beautifully for both day and night looks. Browns are also more forgiving if you're still learning to blend, and they complement virtually every eye colour. For blue eyes, warm browns and coppers make those baby blues pop. Green eyes look stunning with plums and burgundies, while brown eyes can handle pretty much any colour palette.
 25 gm
25 gmPower Stage Eyeshadow Palette
Every great smokey eye needs three main shades: a light highlight colour, a medium transition shade, and a deep colour for intensity. Your highlight shade should be close to your skin tone or slightly lighter. The transition shade bridges the gap between light and dark, while your deepest shade creates that signature smokey drama.
Matte shades are your best friends for creating depth and dimension in the crease and outer corner. Save shimmer for the centre of your lid or inner corner to add that extra bit of glamour without overwhelming the look.
This is where most people struggle with their smokey eye tutorial attempts. Blending is literally the difference between looking like a makeup artist did your eyes versus looking like you applied eyeshadow in the dark. The secret weapon? A fluffy blending brush and the windshield wiper motion. Start with small amounts of product—you can always build up, but it's much harder to tone down. Use gentle, circular motions to soften harsh lines, then switch to that windshield wiper motion to blend colours seamlessly.
You need at least two brushes: one for applying colour and one clean brush for blending. A fluffy dome brush works perfectly for blending, while a smaller shader brush helps with precise colour placement.
This is crucial for an easy smokey eye—start light and build up slowly. Apply your transition shade first, then gradually add your deeper colours. This approach gives you much more control and prevents that muddy, overdone look.
The order you apply your smokey eyeshadow matters more than you might think. Getting this wrong is probably why your previous attempts didn't turn out as expected. Start with your transition shade in the crease, using a fluffy brush to create a soft gradient. Next, apply your medium shade to the outer corner and blend it into the transition colour. Finally, add your deepest shade to the outer V and along the lash line, blending upwards and outwards.
For hooded eyes, place your transition shade slightly higher than your natural crease when your eyes are open. This creates the illusion of more lid space. If you have deep-set eyes, focus more colour on the lid itself rather than the crease area.
Round eyes benefit from extending the smokey effect slightly upwards and outwards to create a more almond shape. For almond eyes, you can follow the natural shape and focus on intensifying the outer corner.
 15 gm
15 gmEyeshadow Palette
A proper smokey eye makeup look isn't complete without addressing the lower lash line. This step connects your entire look and prevents that unfinished appearance. Use a smaller brush to apply a softer version of your crease colour along the lower lash line. Start from the outer corner and blend inwards, stopping about two-thirds of the way to avoid making your eyes look smaller.
The key to avoiding that dreaded raccoon look is using a lighter hand on the bottom. Your lower lash line colour should be about half the intensity of what you've got on top. Think of it as a subtle shadow rather than a bold statement.
Blend the outer corner where your upper and lower lash lines meet. This creates a seamless, cohesive look that appears professionally done.
Eyeliner in a smokey eye look isn't about creating sharp, precise lines. Instead, it's about adding depth and intensity that seamlessly blends with your eyeshadow. Pencil eyeliners work brilliantly for smokey looks because they're easy to smudge and blend. Apply your liner close to the lash line, then use a small brush or your finger to gently smudge it upwards into your eyeshadow.
For the best smokey eye effect, focus your liner on the outer two-thirds of your eye rather than creating a full line across the entire lid. This prevents your eyes from looking smaller while still adding that sultry definition.
The magic happens when your liner disappears into your eyeshadow rather than sitting on top of it. Use a small, dense brush to blend the edges of your liner upwards, creating that perfect smokey gradient.
These final steps separate amateur attempts from professional-looking best smokey eye results. It's all about balance and making sure every element works together harmoniously. Mascara is crucial—your lashes need to match the intensity of your eyeshadow. For a dramatic smokey look, don't be afraid to go bold with your mascara or even add false lashes. The goal is to frame your eyes and complete the sultry effect.
Add a touch of highlight to your inner corner and just under the brow bone. This brightens your eyes and prevents the smokey effect from looking too heavy or overwhelming.
 5 gm
5 gmLustre Eyeshadow Palette
A light dusting of setting powder over your under-eye area before you start can catch any eyeshadow fallout. At the end, a setting spray helps lock everything in place for long-lasting wear.
Step back and assess your work. Clean up any fallout with a makeup wipe, and don't forget to check that both eyes match. Sometimes one eye needs a bit more blending or intensity to achieve perfect symmetry. Exploring different smokey eye makeup techniques becomes so much easier when you can try products without the commitment of full-size purchases. Smytten connects you with over 1,500 trusted beauty brands, letting you discover your perfect smokey eye palette through curated trial packs. With options to get up to 8 minis for just ₹249 and 100% cashback redeemable for future orders, you can experiment with different eyeshadow formulas and find what works best for your unique eye shape and preferences.
For beginners, allow about 15-20 minutes to create a proper smokey eye. As you get more comfortable with the techniques, you can probably do it in 10 minutes or less. The key is not to rush the blending process.
Absolutely! A good neutral palette with a range of browns or greys can create multiple smokey eye variations. Look for palettes that include both matte and shimmer options for the most versatility.
Using too much product too quickly. Building intensity gradually is crucial for a professional-looking result. Also, many people forget to blend properly, which creates harsh lines instead of that smooth gradient effect.
Primer is essential, but also consider using a setting spray specifically designed for eye makeup. Avoid touching or rubbing your eyes, and carry a small brush for any touch-ups needed throughout the day.
Definitely! Try a brown or taupe smokey eye with less intensity for daytime wear. The technique remains the same, but use lighter shades and build up less dramatically than you would for evening.
Mastering the best smokey eye is totally achievable once you understand these fundamental techniques. Remember, it's not about having the most expensive products—it's about understanding colour placement, blending properly, and building intensity gradually. Start with a brown smokey eye if you're new to this look, as it's more forgiving and versatile than jumping straight into dramatic black shades. Practice these techniques, be patient with yourself, and don't be afraid to experiment with different colour combinations. The beauty of smokey eyes lies in their versatility. Once you've nailed the basic technique, you can adapt it for any occasion, eye shape, or personal style. Whether you're going for subtle everyday glam or full-on evening drama, these seven pro tips will help you create that perfect smokey effect every single time. With platforms like Smytten making it easier than ever to try new makeup products through trial-sized versions, there's never been a better time to experiment and find your signature smokey eye style. After all, why settle for maybe when you can try it all and discover what truly works for you?
